Shrink SVI Folder
Description:
I ran into an interesting issue the other day, my C:\ on one of my Server 2008R2 machines was starting to get real full due to the System Volume Information folder found on the root of the C:\. I did the following steps to resolve the issue.
If you want to skip the shrinking and just delete all restore points, run something like:
1
   "C:\Windows\SysWOW64\vssadmin.exe" Delete Shadows /All /Quiet
NOTE: This did not work on my W10 install, but I don’t use System Restore, I use imaged based backups with Veeam Endpoint free.
To Resolve:
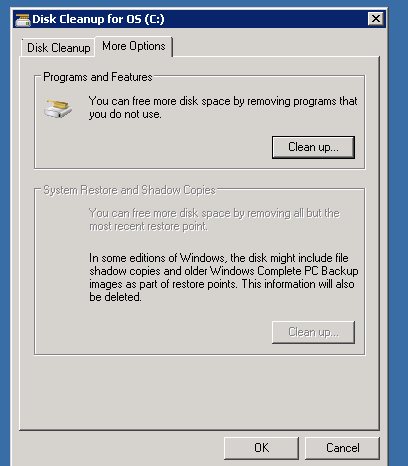
- Run =>
cleanmgr.msc=> Select System Restore and shadow copies => Clean up. This usually will fix the issue, but what do you do when it’s greyed out? - Open an elevated command prompt and type:
vssadmin resize shadowstorage /for=c: /on=c: /maxsize=1024MB
Update 2018-03
- I used the following method recently:
-
Run =>
diskmgmt.msc=> Select the drive => Properties => Shadow Copies -
In the list of copies, select those over 10 days old and delete them all.
- To do it via command line:
1
2
3
diskshadow
Delete shadows OLDEST <BackupStorageLocation>
Exit
- I believe you would have to do this multiple times, so create a loop. Something that collects all restore points and only keeps the latest ten. I just did it via GUI since it was a one off task on one machine.
- This only works if VSS/ Diskshadow is enabled. Since Windows 8, Shadow Copies is replaced by “File History”:
-
If you really want to enable Shadow copies on Windows 10, you have to do the following:
-
Enable it by following step 1 above. From CMD:
wmic shadowcopy call create Volume=c:\ -
Create a scheduled task => Open Task Schedule and create task => name it ShadowCopy_C (or any other name you want) => select the triggers, once it was at 07:00 and 12:00 every day => At the action tab write
wmic=> at the arguments =>shadowcopy call create Volume=C:\ -
Do this for each drive
-
It is highly advised you use a network drive to a file server that is backed up over VSS. You could also use an attached backup HDD per the link in step 3.
-
Comments