MS Flow Custom Connectors
Description:
Microsoft Flow is an automation tool that Admins can use to connect services in the cloud. Basically, a Microsoft version of the app IFTTT. It has a section called ‘Custom Connectors’ where you can define REST API calls and then use those in flows to create automated tasks. In this example, I’m just going to create a flow that is manually triggered and will take a CSR request, send it to our third party CA, and then take the payload they return and email it to me. Just to ensure it works, I will copy it locally to my machine to a .crt file and then import it!
To Resolve:
- Sign in to flow.microsoft.com => Data => Custom Connectors => Create new. Go to General and put the general endpoint URI with everything else past the domain name on the second line:
- For example,
Host = Cert-manager.com
BaseURL = /api/ssl/v1
- For example,
-
Continue to ‘Security’. In this case, we will choose
No Authenticationwhich is odd, but it is how this particular endpoint works. -
Next go to Definitions and then click the plus on Actions => Request. Give it a name, in our case it will be
request_cert - Next, go to Request and click
Import from sample. When the screen comes up, enter all the headers and the body for the request.- For this, I was able to get them from my powershell script, but they would be like: content-type, login, password, customerURI. The easiest way to get this is to do a request in Post-man and then get the headers and put them in here.
- Click import
- Then click ‘Create connector’.
-
We then go to Test. On Selected connection just hit refresh and it will get the name of the flow. Keep in mind that it is probably doing this one time for now because I chose ‘no authentication’, but in reality – you would normally use this part of the form to request an API token so that you can send a request. Like I said, this was an odd example since the request doesn’t require authentication at first, but instead you pass authentication parameters in the header of the request. Thankfully the endpoint uses HTTPS so it is encrypted in transit.
-
Fill out the request like you would if you were sending a request and you should be able to request a certificate (It will return a SSLID)!
-
Go to response and add the response section from the response generated from the request. This will be helpful later when we go to build the form.
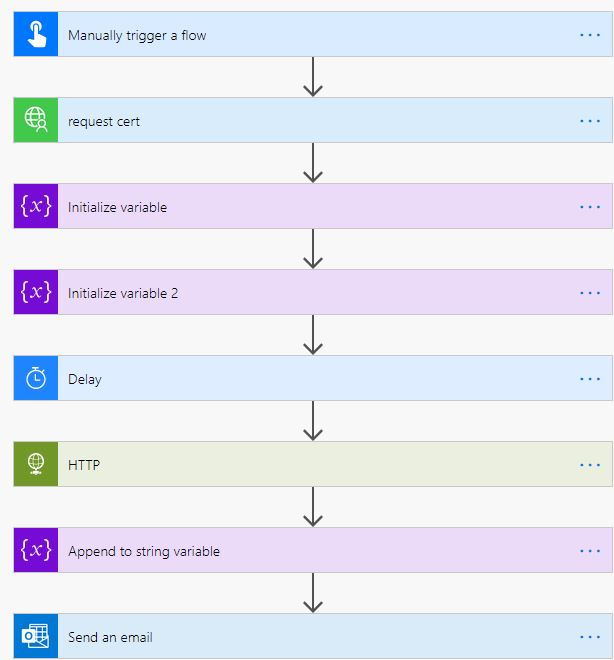
- OK, so at this point the custom connector is created! Now we are going to create an example flow, I called it ‘Test-API-Cert-To-Email’
- Go into flows => create new => Manual flow => Now add in our Incommon request.
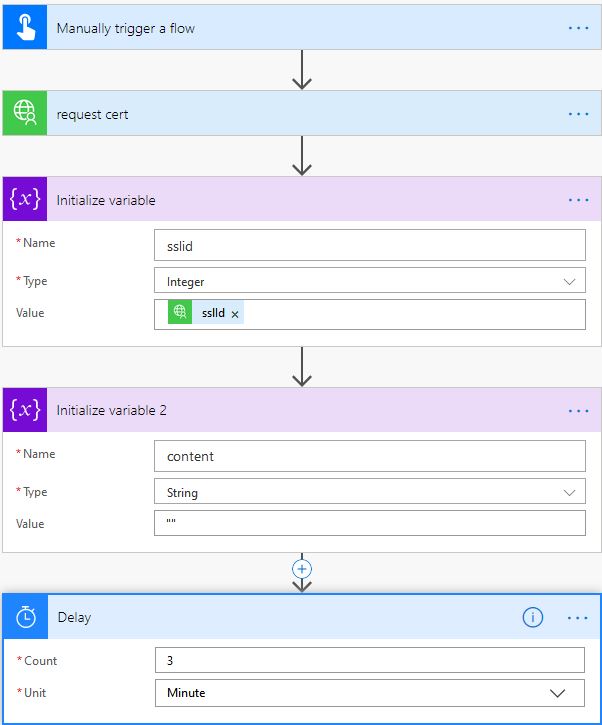
- Add a new step afterwards with a type of ‘Initialize Variable’ that initilizes a variable called ‘sslid’ with a type of integer and a value that will be the SSLID from the REST response.
- Add a new step afterwards with a type of ‘Initialize Variable’ that initilizes a variable called ‘content’ with a type of string and value of
"". - Add a new step afterwards with a type of ‘Delay’ for 3 minutes.
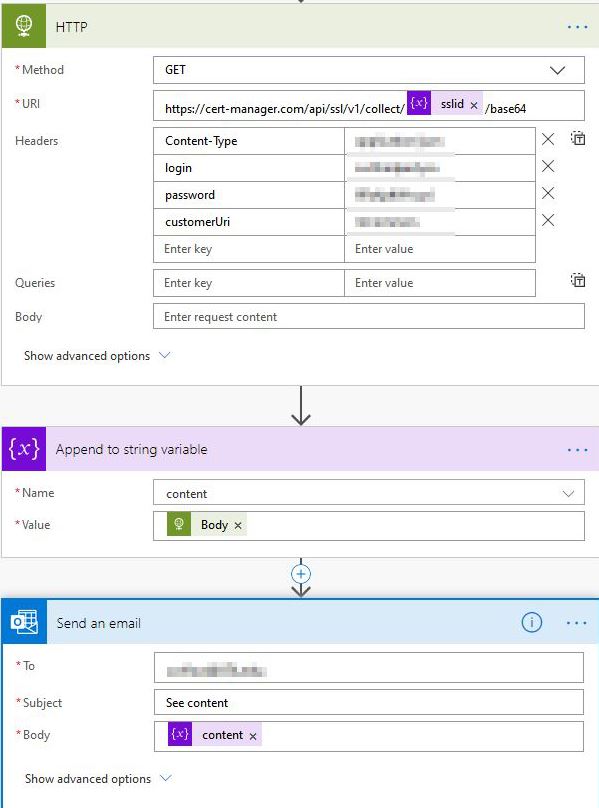
- Add a new step afterwards with a type of ‘HTTP’ that uses a REST call to the endpoint with the SSLID to get the cert payload.
- Add a new step afterwards with a type of ‘Append to string variable’ that will append the body of the previous step to the variable ‘content’.
- Add a new step afterwards with a type of ‘Send an email’ that sends the variable content in the body.
-
Test the flow. I took the email it sent me and then copied and pasted to
c:\scripts\test.txton my machine. I then renamed totest.crt. I then rancertlm.mscand imported the cert to my personal store and it worked! - Pics
Comments