Hyper-V High Availability
Description:
Follow these steps to setup High Availability between two or more servers. Note that High Availability can be used for many things, in my test lab I set it up to be used with Hyper-V applications since that is a common scenario. The following steps will setup “Hyper-V with Fail Over Clustering”. Please make sure that you have two VM’s with the same OS, same roles, same everything for this to work. I had to do this three times due to subtle differences.
To Resolve:
-
First, setup an iSCSI Share or some kind of shared storage solution between the two servers. I recommend following the steps in FreeNAS.
-
Install the “Hyper-V” role and the “Fail Over Clustering” feature from Server Manager and grab an iso for a VM (I used a Linux Mint VM due to small file size). Do this for each server. If you are doing this in VMWare Workstation, follow these sub steps:
- First, shut down the VM.
- Make certain that you’ve enabled VT-x/EPT in your virtual machine under Settings => Processors.
- Modify the vmx file associated with your VM by opening the file in Notepad and adding these lines at the end and saving:
1
2
hypervisor.cpuid.v0 = "FALSE"
mce.enable = "TRUE"
- Boot your VM back up. If it gives and error and corrects it, just ignore it (mine did).
-
Launch the Failover Cluster Manager, select the option to “Validate Configuration” which will launch a wizard. Add the host names of the two servers and run all tests.
-
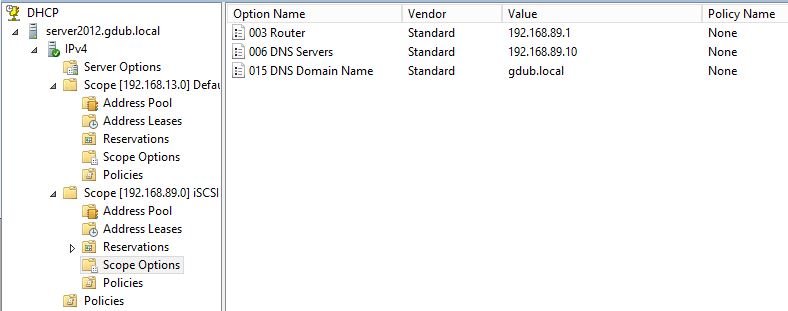
So this was a little bit of a hastle for me because I had my iSCSI share on the same subnet as my internal network. To fix, I added another network adapter with it’s own subnet and configured FreeNAS, the DHCP server on my DC, and my two VM’s all point to the new segregated iSCSI subnet.
-
-
-
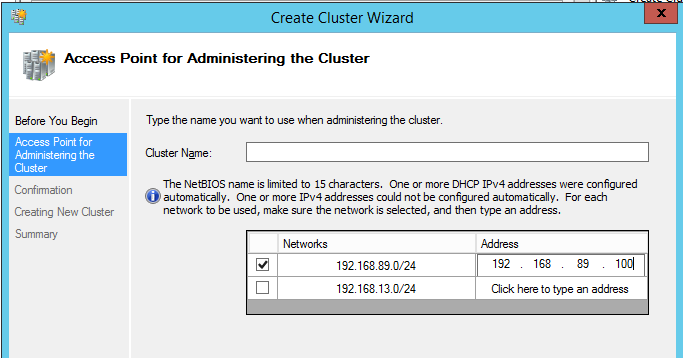
Back to the good stuff, now we create a cluster by launching “create a cluster”. So give it a name and make sure only to select your subnet and give it an IP address. The screenshot below was the first time I ran this and I ended up failing miserably. The second time I was on DHCP and it automatically selected both network cards and took DHCP as a valid source, so I went with it.
-
At this point you have a cluster! Now, to to your cluster => Roles => Configure Role => Virtual Machines => Next => Finish.
-
Next, we need to get “Shared Access Rights” for the disks. Highlight your cluster name and then go to Actions => More Actions => Configure Cluster Quorum Wizard => Next => Select the Quorum Witness => Do not configure a Quorum Witness => Next => Done. Note: I only had one disk in this share and when the cluster was created, it automatically assigned it as a quorum. To learn more about Quorums, see here. What I chose said it was not “Best Practice”, but again, I just want to get the damn thing to work at this point AND its in a lab. I would research more before doing something like this in production.
-
Now navigate down to Storage => Disks => Right click your disk => Add to Clustered Shared Volumes (CSV)
-
On both servers, open up Hyper-V Manager, go to Hyper-V Settings and change the default storage to your newly created Volume 1 path. I created a sub-folder for each host name in my cluster so their VM’s can be separated.
-
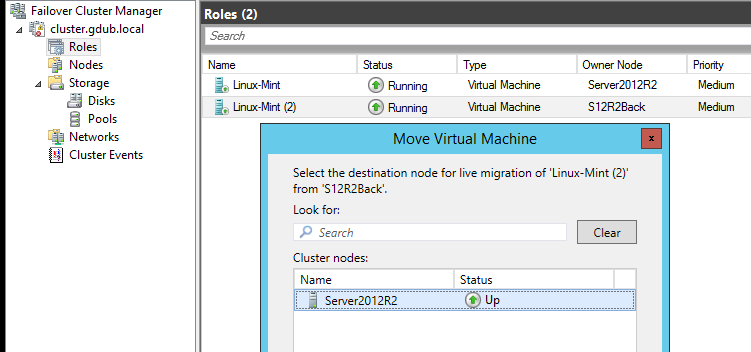
Now comes the fun part. Spin up the VM’s on each server and then on one of them, right click on the VM and choose Move => Live Migration => Select Node => Choose the other server in the list. It will move the VM over in about 30 seconds!
-
-
If you really want to play with this. Move both VM’s to the same server and then go to Nodes => Select the server with both running VMs => Right Click => More => Stop Cluster Service. Then hurry and go to your Roles tab in the navigation tree and watch them migrate over to the other server without an issue. Check the Youtube video in the links for a visual representation.
-

References:
“Virtualization: Hyper-V and High Availability”
“Using FreeNAS 8 to Create an iSCSI Target for Windows 7”
Comments