PFSense Install
Description:
Follow these steps to install and configure Pfsense, the free router OS.
To Resolve:
-
Get the download file from pfsense.org. I chose the 64-bit (v2.2.24 LiveCD) version.
-
Launch your VM creation software (VMware Workstation for me).
-
Select FreeBSD 64bit and finish installing how you normally do. Make sure you have two network adapters, one bridged (WAN) and one internal (LAN to be assigned by PF). Make sure that you don’t enable the DHCP server on the Network editor if you want Pfsense or a domain controller to be assigning IP’s on that subnet.
- So to recap:
- NIC1: VMnet0 => Bridged (automatic)
- NIC2: VMnet10 => Host-Only 10.13.13.0 (just make up any subnet, you will change it anyways) MAKE SURE DHCP is not enabled in your virtual network editor.
-
Once it launches, it will bring you to a menu and start to boot automatically. Let it get to the screen where it counts down from 10, and type “I” to launch the installer.
-
On the installer, just hit “accept these settings” and continue. On the next screen select “OK”, and then “Standard Kernel”, then “reboot”.
-
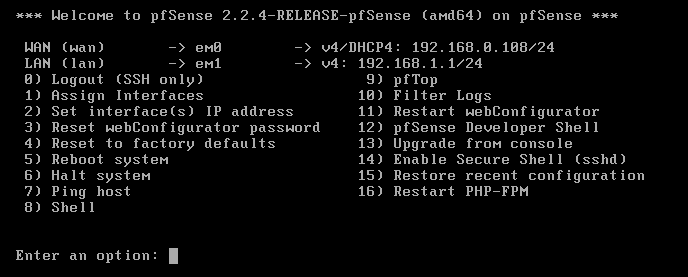
Pfsense is now installed! Now press F1 to boot into it. If you have been following along, your screen should look like mine below. Note that I had the bridge adapter set as my first NIC and it has the name of “em0” (WAN) and my second internal network adapter NIC is called “em1” which will be my LAN link.
-
Now select the option “2” to set a static IP for your LAN link. I set mine to 172.21.14.1 with a start dhcp of 172.21.14.100 and ending of 172.21.14.200.
-
Now just leave that running and open up a client VM and assign it the same network as the LAN link on Pfsense (VMnet10 for me) and run a quick:
1 2
ipconfig /release ipconfig /renew -
After this, the client should be able to access the UI for Pfsense. Open up a web browser and go to the LAN IP you assigned in step 7.
-
Login using “admin/pfsense” and either skip the wizard or go through it to configure your new router. Enter the information for your router and get to the part where you change your PFsense password. After that, it reloads and you are done! Now all you have to do is configure the router the way you want for your network.
Comments