Install WSUS Role With SQL Server
Description:
Follow these steps to install WSUS with a SQL server instance instead of the WID setup.
To Resolve:
-
Install SQL Server => Create an instance called WSUS
-
Select Windows Server Update Services => Click add features => You do not require any other extra features for this role so just click next. Deselect WID database (Only select the bottom two WSUS Services and Database) => Select Store updates in following location (I always pre-create this folder on a drive with enough space to store the content) enter the location to your content folder => Enter the name and instance of your Database server and test the connection => The defaults are fine so just click next => On the confirmation page just click next => and then finish.
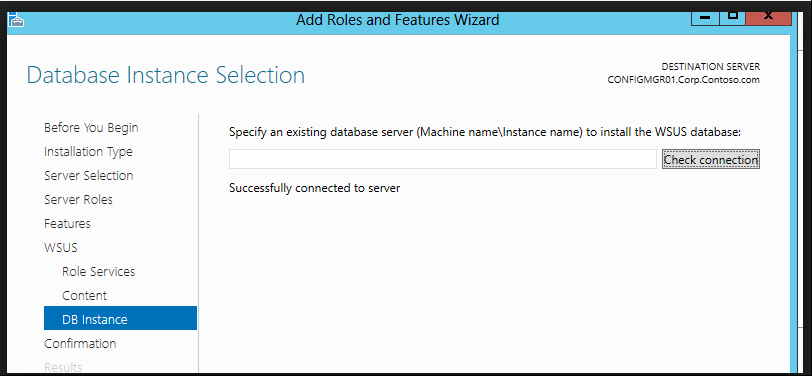
- Note, if you are having issues connecting to your SQL instance, do servername\instance name or just servername and it might find it automatically. If it’s on the same server, try “localhost” instead of the hostname. You just have to enter the hostname of the SQL server and its default instance will get selected. Sometimes it’s localhost\wsus or localhost.domain.com\wsus or just locahost. Try different ones and just keep selecting “Check Connection”.
-
Once the role is installed you have to finish some configuration tasks. Go to
C:\Program Files\Update Services\AdministrationSnapinand startup theWSUS.msc. Here you can re-enter the SQL Server name and instance of your database server for WSUS to go and create the database on. Also add the path where you would like to store the content for WSUS. Click on Run! -
WSUS should now have successfully created your database and startup the wsus console. Leave the sync with Microsoft update option and click next. Click on Start Connecting to start up your connection to Microsoft Update. Here you can select an extra language to support if you require a specific language for the software you installed. Choose the products for which you want updates you can always update this list if you forget something. For Classifications, uncheck Drivers as those are better handled with WDS Server. Now choose the type of updates you want to receive or you would want to service to your clients. Configure your sync schedule I always set mine to a time that won’t impact the backup schedule or Network bandwidth. Select begin initial sync to get the update classifications for the products you selected.
-
Click Finish you WSUS should now be configured properly to get the updates for the clients you specified. That completes the setup of WSUS!
-
You are still not done though there are still a few tasks to complete before your clients will gather the updates from this newly installed WSUS server.
- You need to create computer groups within WSUS. For me, I would go with GPO called “Client Side Targeting”:
Computer Configuration\Policies\Administrative Templates\Windows Components\Windows Update- Enable Client Side Targeting => WSUS Container Name, for me it is Servers, Workstations, and Test.
- While in this area, we will create a GPO and copy it => one for Workstations and the other for Servers. We will set them the same except for a few settings:
1
2
3
4
5
6
7
8
9
10
11
12
13
14
15
16
17
18
Workstations:
Configure Automatic Updates => Enabled
Configure Automatic Updating: 4 => Auto download and schedule the install
Scheduled Install Day: 0 => Every Day
Scheduled Install Time: 03:00
No Auto-Restart with logged on users… Disabled
Specify Intranet Location = Enter your WSUS server IP twice: http://192.168.0.100:8530 # We will most likely change this later if we go with SSL.
Allow Automatic Updates immediate installation => Disabled

Servers:
Configure Automatic Updates => Enabled
Configure Automatic Updating: 4 => Auto download and schedule the install
Scheduled Install Day: 1- Sunday
Scheduled Install Time: 03:00
No Auto-Restart with logged on users… Enabled
Specify Intranet Location = Enter your WSUS server IP twice: http://192.168.0.100:8530
No Auto-Restart with logged on users… Disabled for Workstations, Enabled For Servers. # It means it will auto reboot for workstations and not for servers
Allow Automatic Updates immediate installation => Disabled
- Configure your auto approval rules so that Test is auto approved, and then Workstations/Servers are auto delayed.
-
Now we need to setup the WSUS server clean up script. I say “the” because I’ve been using it for years in different environments and never had any issues.
- For the script, do the following:
- Set the email variables from lines 607-629
- Optionally add the line (after line 3247):
1
[System.Net.ServicePointManager]::ServerCertificateValidationCallback = { return $true }
- Place in C:\scripts
- Open admin shell and type:
1
2
3
4
5
6
7
Set-Executionpolicy Bypass

# This will run the script and install the scheduled task.
.\clean-wsus.ps1 -FirstRun

#Return Executionpolicy To Normal
Set-Executionpolicy RemoteSigned
Comments