Apply CIS Benchmarks
Description
The goal of this project was to use Puppet Enterprise to apply a “Base CIS” class to both windows and linux servers in our organization that will accomplish level 1 controls on our servers. This was accomplished and is maintained at My Github Repo
Overview:
- Step 1: Download Microsoft GPO’s for Baseline config
- Step 2: Create Testlab
- Step 3: Setup Puppet Enterprise and Capture Settings
- Substep: Apply GPO’s from Baseline and use Puppet to capture settings
- Step 4: Download Assesor and check settings - Should show everything as failing.
- Step 5: Correct Settings and Create Classes in Puppet - Note that for Windows we wanted to apply settings using Local Security Policy instead of GPOs so that settings can be managed via Puppet. We will eventually move to DSC for this.
- Step 6: Functional Testing - Show everything as passing
- Step 7: Project Handoff
To Resolve
-
For Windows Servers, download GPO’s
-
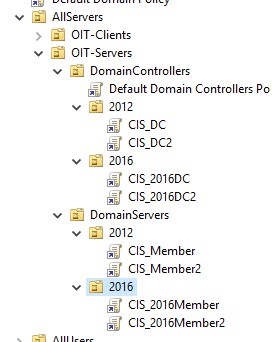
Create a Test Lab with:
- Windows Server 2012r2 Domain Controller and member server
- Windows Server 2016v1604 Domain Controller and member server
- Centos 7.6.1810
- RHEL 7.6 Maipo
- PFSense firewall VM
-
Setup Puppet Enterprise free VM (up to 10 nodes):
wget --content-disposition https://pm.puppet.com/cgi-bin/download.cgi?dist=el&rel=7&arch=x86_64&ver=latestcurl -JLO '<DOWNLOAD_URL>'- Master: https://pm.puppet.com/cgi-bin/download.cgi?dist=el&rel=7&arch=x86_64&ver=latest
- Agents:
- RHEL7: https://pm.puppet.com/puppet-agent/2019.1.0/6.4.2/repos/el/7/puppet6/x86_64/puppet-agent-6.4.2-1.el7.x86_64.rpm
-
Windows: https://pm.puppet.com/puppet-agent/2019.1.0/6.4.2/repos/windows/puppet-agent-6.4.2-x64.msi
- Download the tarball appropriate to your operating system and architecture.
- curl -JLO https://pm.puppet.com/cgi-bin/download.cgi?dist=el&rel=7&arch=x86_64&ver=latest
- or
- wget –content-disposition https://pm.puppet.com/cgi-bin/download.cgi?dist=el&rel=7&arch=x86_64&ver=latest
-
NOTE: This didn’t appear to be making progress so I went to the actual server and ran the command in the GUI and watched the tar.gz download. - I think it may have just been because the installer is half a GB.
- Import the Puppet public key.
-
wget -O - https://downloads.puppetlabs.com/puppet-gpg-signing-key.pub gpg –import - Print the fingerprint of the key.
- gpg –fingerprint 0x7F438280EF8D349F
- gpg –verify puppet-enterprise-
- .tar.gz.asc - Download and install:
- tar -xf
- cd puppet….
- sudo ./puppet-enterprise-installer
- Got error:
1 2
Could not prefetch pe_node_group provider 'ruby': Received 5 server error responses from the Node Manager service at https://puppet.williamsg.test:4433/classifier-api: 500 {"kind":"application-error","msg":"Connection refused"} [Error]: Failed to apply catalog: Received 5 server error responses from the Node Manager service at https://puppet.williamsg.test:4433/classifier-api: 500 {"kind":"application-error","msg":"Connection refused"}- Fix:
- Add more memory, reboot and run the command again
- It then gave me a link to reset my password. I copied and pasted into a browser and it worked. Sign in = login to web gui using admin/pass
1
2
3
4
5
6
7
8
puppet infra console_password --password=<MY_PASSWORD>
puppet agent -t

firewall-cmd --get-active-zone
#public
firewall-cmd --zone=public --add-port=443/tcp --permanent
firewall-cmd --zone=public --add-port=8140/tcp --permanent
firewall-cmd --reload
-
Now install the puppet agent on nodes:
- Centos:
curl -k https://puppet.williamsg.test:8140/packages/current/install.bash | sudo bash - Windows: Download https://pm.puppet.com/puppet-agent/2019.1.0/6.4.2/repos/windows/puppet-agent-6.4.2-x64.msi on admin.williamsg.test
-
Then use a script to push and install it:
-
$servers is a propulated variable with each server in our environment
- so…
1
2
3
4
5
6
7
8
9
10
11
12
13
14
15
16
17
18
Foreach ($server in $servers)
{
   Invoke-Command -Computername $server -ArgumentList $server -Scriptblock {
   param($server)
      If ((-not (Test-Path "c:\scripts")))
      {
      New-Item -ItemType Directory -Path "c:\scripts" | Out-Null
      Write-output "created c:scripts on $server"
      }
      Write-output "downloading script on $server"
      [System.Net.ServicePointManager]::SecurityProtocol = [Net.SecurityProtocolType]::Tls12
      [Net.ServicePointManager]::ServerCertificateValidationCallback = {$true}
      $webClient = New-Object System.Net.WebClient
      $webClient.DownloadFile('https://puppet.williamsg.test:8140/packages/current/install.ps1', 'c:\scripts\install.ps1')
      Write-output "installing script on $server"
      c:\scripts\install.ps1
      }
}
-
Login to the web GUI - Go to unsigned certs - Accept all
-
On the puppet master, install modules:
1
2
3
cd /etc/puppetlabs/code/environments/production/modules
puppet module install kpn-local_security_policy --version 3.1.1
# if that one doesn't work, try https://forge.puppet.com/ayohrling/local_security_policy
- Lastly, apply the GPO’s from Step 1 and run
puppet resource local_security_policy > c:\scripts\server.txton each server and copy the settings displayed to a text file. These files will be the foundation for puppet classes.
-
Now we setup an initial baseline scan by downloading the client tool which will be ran on each system to get us a “score” of the systems current security level - CIS Workbench Assessor-CLI-v4.0.7
- Install the server software by following Dashboard Deployment Guide for Windows
- We start on Windows because it will be harder to fix than linux where everything can be fixed by shell scripts.
-
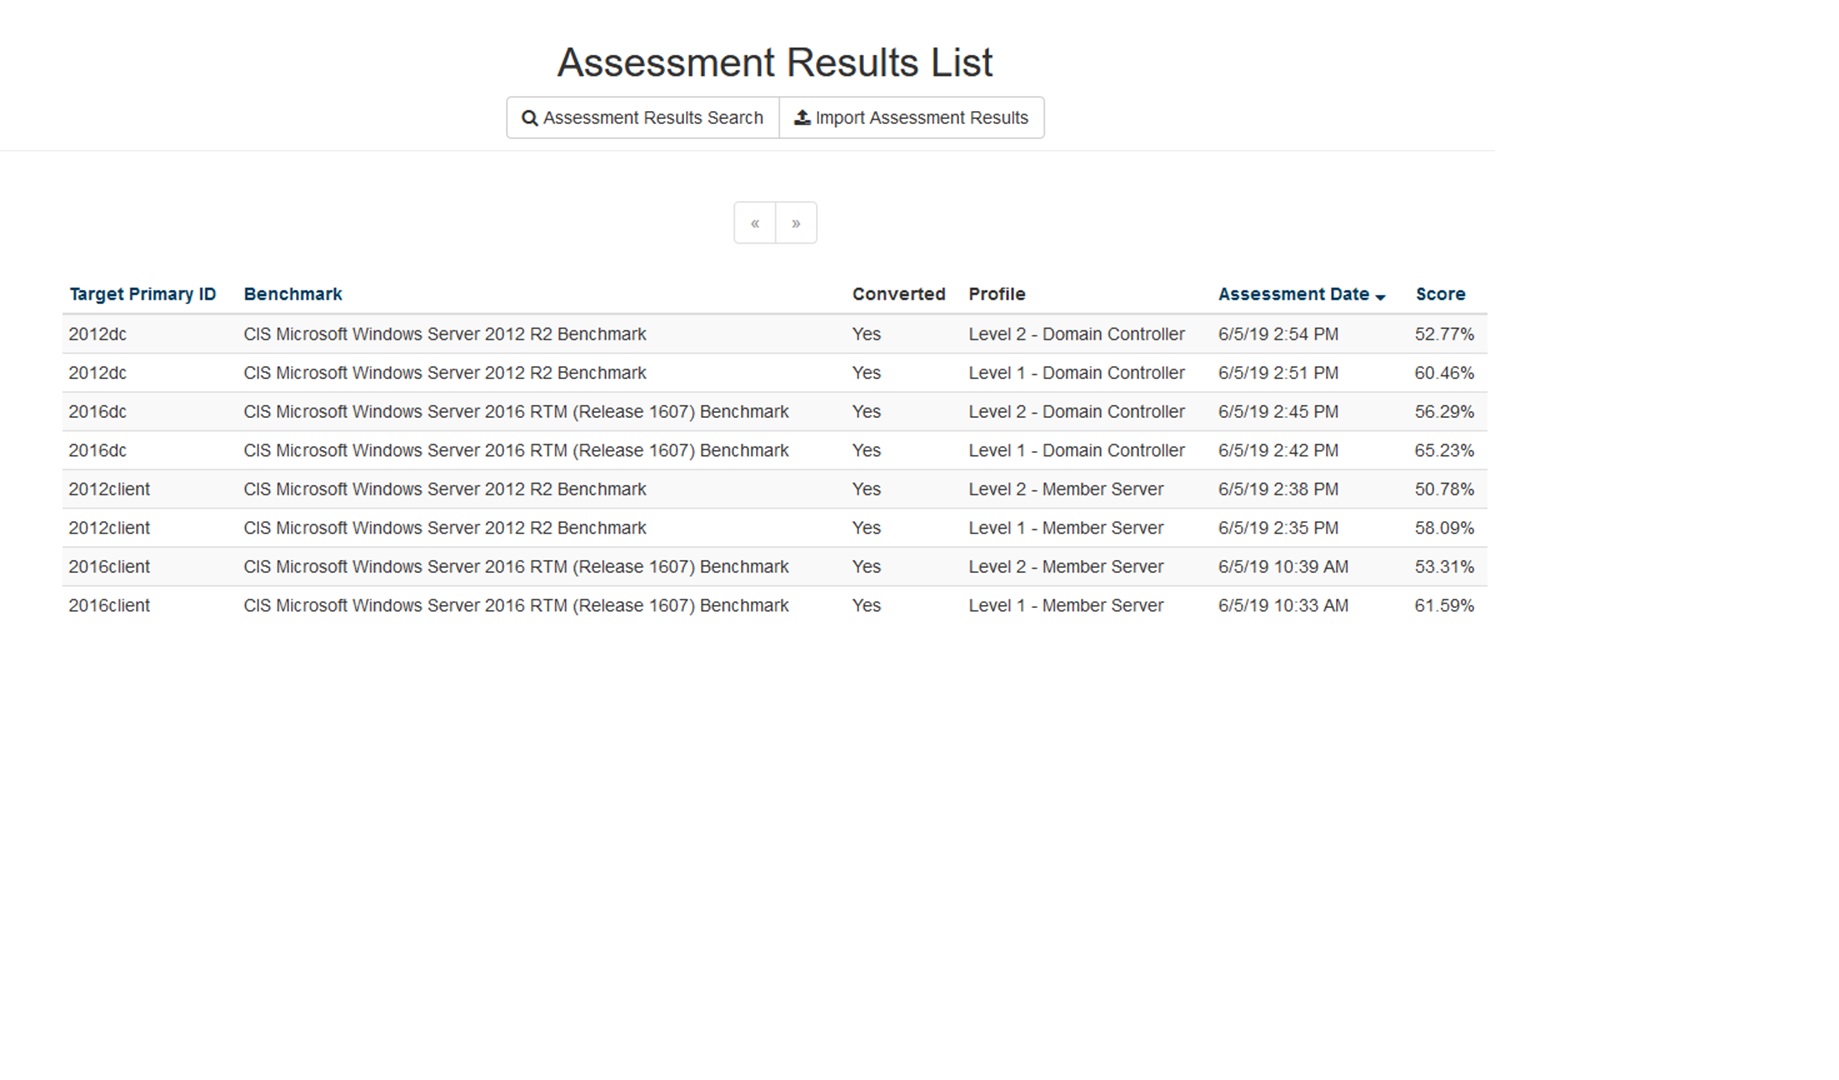
Here are the initial results:
-
- To increase the scores, Go to CIS Benchmark website – Search the benchmark - Download the ‘Remediation Kits’ for them.
-
For Windows, these are new GPO’s to be applied. So we do that.
-
- On each client: Run
gpupdate /force, reboot, then rungpresult /scope computer /h c:\scripts\computer.html; gpresult /scope user /h c:\scripts\user.html - Open the files and ensure that policies were inherited correctly. Ignore errors.
- Now go to
c:\scripts\Assesor-CLIand run the report again - Much better!

-
Now run:
puppet resource local_security_policy > c:\scripts\2016dc_updated.txt -
This fixed Windows pretty well, but what about Centos/RHEL? Well out of the box they are not doing so good:
- LinuxServer
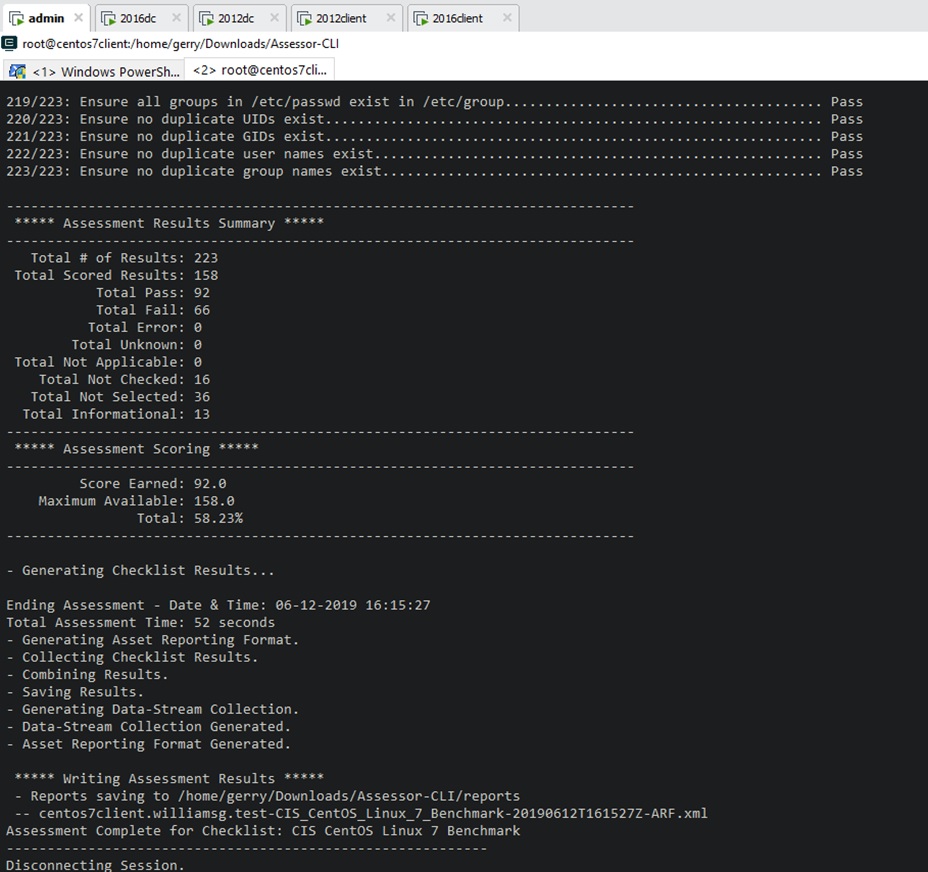
- RHEL
-
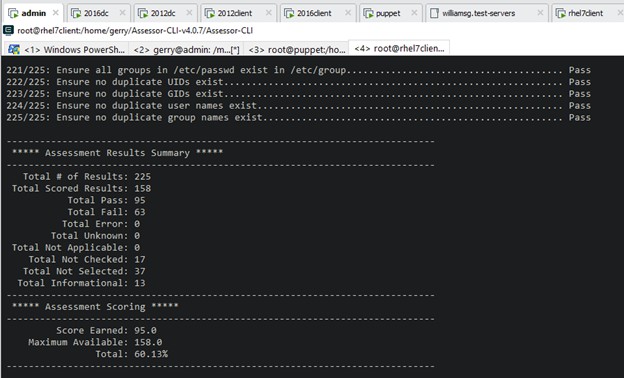
- Run remediation (shell scripts) and I get better results (around 87%).
-
Now that we have an idea of remediation, we need to find a way to convert these to puppet classes. This is obviously the hardest part of the project as you have to find a way to have puppet apply a default class to each kind of server that will remediate most of the issues.
-
This is too complicated to list here, but if you know how to read puppet classes, start with init.pp and work your way downwards.
- For Windows, the main fixes are two fold:
- On one hand, puppet just sets a ton of registry settings. These are my preferred way to manage settings:
1
2
3
4
5
6
# rule_2.3.1.4_L1_Ensure_Accounts_Limit_local_account_use_of_blank_passwords_to_console_logon_only_is_set_to_Enabled
registry_value { 'HKEY_LOCAL_MACHINE\SYSTEM\CurrentControlSet\Control\Lsa\LimitBlankPasswordUse':
ensure => present,
type   => dword,
data   => 1,
}
-
On the other hand, Windows is managed by
LGPO.exe(with CSV files for audit policies and inf files for local security policies) ,laps.msi, and others. See 2012 and 2016 -
For linux, I just used a series of shell scripts that will test settings on the first run, and then execute scripts if something fails
-
Comments