Setup Azure Devops For Terraform
Description:
In this post, I will outline the steps I performed to sign up for Azure Devops and Azure so I can continue testing things I have learned with Terraform. The repo used as a reference in this post can be found here. Please reference this as you read along.
To Resolve:
-
Create free account at Azure Devops and a sign up for Azure Subscription at Azure
- This creates an Azure Active Directory tenant with a root user named:
gerryw1389_gmail.com#EXT#@gerryw1389gmail.onmicrosoft.com - Before following the rest of this post, you may want to skip ahead to filling out a required form for Azure Devops and waiting before continuing.
- This creates an Azure Active Directory tenant with a root user named:
-
Go to Management groups and create a new one called
Automation Adminand then move the pay-as-you-go subscription under it. -
Go to Cost Management and create a budget of
$20and have it email when it gets to$10. -
Create a new local admin user in Azure:
automationadmin@gerryw1389gmail.onmicrosoft.com -
Setup 2 factor for sign up account and my separate Admin account:
- Go to Azure AD => Properties => Manage Security Defaults => Enable
- Now sign out and sign back in as each user and setup Microsoft Authenticator app
-
Sign in as Automation Admin and see if you can view subscriptions.
- Go to subscriptions and set ‘Automation Admin’ as Owner at the sub level.
-
Create a storage account for cloud shell:
- Create Resource Group:
tx-storage-rg - Create Storage Account:
automationadminstorage- Go to the Access Keys blade and copy one of the access keys to notepad for later (myAccessKey).
- Create File Share:
cloudshell
- Create Resource Group:
-
Now use Cloudshell to create a Terraform application:
1
2
3
4
5
6
7
8
9
10
$sp = New-AzADServicePrincipal -DisplayName "az-terraform"

$sp.AppId
myClientID

$sp.PasswordCredentials.SecretText
myClientSecret

(Get-AzContext).Tenant.Id
myTenantID
-
Take note of your Subscription ID: mySubscriptionID
-
Now set a new client secret that doesn’t expire as soon. First get the object ID of the App Registration for
az-terraformfrom powershell or the GUI and then run:
1
2
connect-azuread
New-AzADAppCredential -ObjectId $objectID -EndDate ((Get-Date).AddYears(5))
-
-
Go to Subscription => IAM => Give contributor to
az-terraform -
Now we need to create a repo and upload some files:
- On your local machine, ensure SSH Client is installed for windows:
Add-WindowsCapability -Online -Name OpenSSH.Client~~~~0.0.1.0
1
2
3
4
5
6
7
8
9
10
11
12
13
14
15
ssh-keygen -t rsa -b 4096 -C "automationadmin@gerryw1389gmail.onmicrosoft.com"

# In GUI, disable inheritence for C:\Users\myuser\.ssh\id_rsa and set the `id_rsa` to where only your user can access
ssh-add C:\Users\myuser\.ssh\id_rsa

# Add the public portion of your key to Azure Devops and then try to pull
git clone git@ssh.dev.azure.com:v3/MyOrganization/MyProject/MyRepo

cd Terraform
git config --local user.name 'Automation Admin'
git config --local user.email 'automationadmin@gerryw1389gmail.onmicrosoft.com'
New-Item -ItemType File -Path . -Name "myfile.txt" | Out-Null
git add --all
git commit -m 'first'
git push origin
- Now that the repo is created, download the files I posted on Github and upload them to Azure Devops under
MyOrganization/MyProject/MyRepo
- On your local machine, ensure SSH Client is installed for windows:
-
Now in Azure Devops, under your Project, open up Pipelines => Libary => and create one called
Pipeline_Secrets. Now add in our secrets from prevous steps:1 2 3 4 5
subscription-id mySubscriptionID tenant-id myTenantID az-tf-client-id myClientID az-tf-client-secret mySecret tfstateaccesskey myAccessKey
-
Inside Resource Group
tx-storage-rg, under the storage accountautomationadminstorage, add our newaz-terraformapplication to the IAM blade under role assignmentStorage Blob Data Contributor.- While in there, go to Containers and create one called
tfstatesbx, we will point to this with our providers.tf
- While in there, go to Containers and create one called
-
Now in Azure Devops, let’s create a connection to Azure:
- Go to Project Settings => Service Connection => Azure Resource Manager => Sign in to pop up window. We will call this
azdo-sc - Inside Azure, you will see a new App Registration named
AzureDevopsOrganization-Project-someGuidthat has Contributor rights at the sub level.- I think this is only used for authentication because all deployments are using my
az-terraformservice principle in the pipeline. More on that later.
- I think this is only used for authentication because all deployments are using my
- Go to Project Settings => Service Connection => Azure Resource Manager => Sign in to pop up window. We will call this
-
Now create a quick Build pipeline. Go to Pipelines => New => Existing Repo => Point to the build.yaml in the master branch.
-
If you try to run it, you will get an error saying to authorize connections. After allowing the connections, you will get another error about
no parrallel jobs have been purchased:No hosted parallelism has been purchased or granted. To request a free parallelism grant, please fill out the following form https://aka.ms/azpipelines-parallelism-request- In order to fix, you must fill out that form and wait a day or so. I got a response the next day.
-
So the next day after getting an email saying parallelism has been enabled, I reran the build and got this on the terraform plan part:
1 2 3 4 5 6 7 8 9 10 11 12 13 14 15 16 17
Terraform will perform the following actions: # module.azure_learning_rg.azurerm_resource_group.rg will be created + resource "azurerm_resource_group" "rg" { + id = (known after apply) + location = "southcentralus" + name = "aa-dev-tx-test" + tags = { + "Appenv" = "dev" + "Apppoc" = "gerry@automationadmin.com" + "CostCenter" = "100" + "EntAppname" = "Automation Admin Terraform POC" + "Owner" = "Automation Admin" } } Plan: 1 to add, 0 to change, 0 to destroy. -
Now that I have reviewed the changes, I created a new pipline that will actually create the resource group:
- Go to Pipelines => New => Existing Repo => Point to the release.yaml in the master branch.
-
If we go into Azure we can see that the Resource Group has been created! Note that the name may not match with the repo because I have changed many things but you get the idea:
-
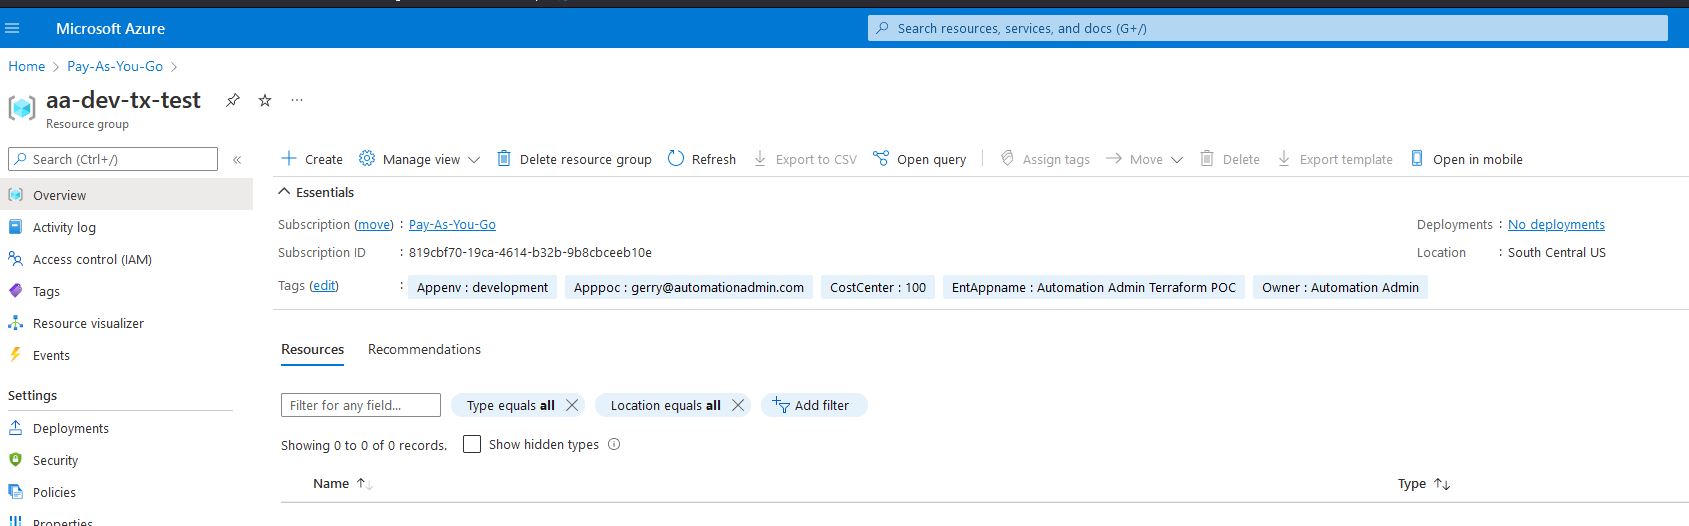
-
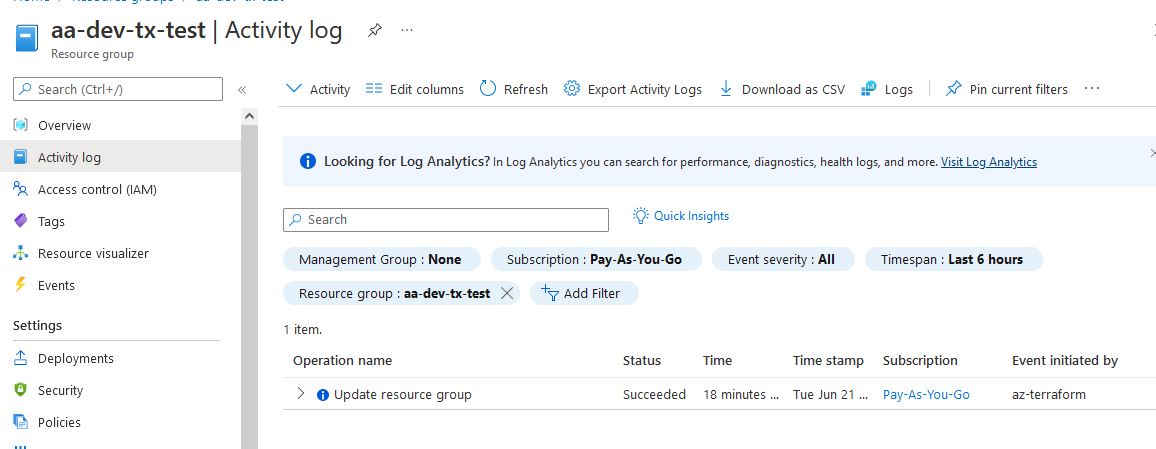
Also, if we go to the Activity log we can see that it was created by the user
az-terraformand not the App Registration that Azure Devops automatically created. This is important because you need to allow this Enterprise Application access to many things that you want to build on future steps. -
-
-
Now that everything is working, let’s look at the files and explain how they work:
-
First, what goes in each one?
Name Description deploy/main.tf This is the “controller” script that will call modules in the correct order to build resources. deploy/providers.tf This sets up providers that will be used. deploy/variables.tf The declares input variables that will be used. resourcegroup/main.tf This is a “function” script that has the single purpose of deploying a Resource Group. resourcegroup/variables.tf These are variables that are needed to create a Resource Group both mandatory and optional. resourcegroup/outputs.tf This describes outputs that will be returned if this “function” is used. build.yaml This is an Azure Devops Pipeline file that describes the steps to deploy resources into Azure. release.yaml This is exactly the same as build.yaml, but also include a terraform apply so that the actions actually happen. -
In what order do you read them?
- There is no one universal answer but I would start with
build.yamland see that pipeline variables we built earlier inPipeline_Secretsare being passed todeploy/variables.tf. - In addition,
deploy/providers.tfis using the access key of our storage account to write state files. deploy/providers.tfis also using thePipeline_Secretsvariables to populate the details for our Service Principle that will be interacting with Azure,az-terraform.deploy/main.tfis the main controller file that calls all the files under./ResourceGroupwhich is just a self-contained module for deploying a Resource Group- You may be asking, “why a module?” Truth is, this is for scalability so that if you wanted to deploy a vnet for example, you could create a
vnetfolder along with all the inputs and outputs the resource will need. - You could remove the module call altogether and merge
resourcegroup/variables.tf,resourcegroup/main.tf,resourcegroup/outputs.tf, all intodeploy/main.tfdirectly if you wanted. - Likewise, you could combine all these
*.tffiles into a single file like I used to when I was first learning terraform (see vm) and have Terraform engine figure out the order but it is important to break things down into “modules”. - Official recommended file structure which is covered on a later post
- You may be asking, “why a module?” Truth is, this is for scalability so that if you wanted to deploy a vnet for example, you could create a
- There is no one universal answer but I would start with
-
Other resources:
Comments